

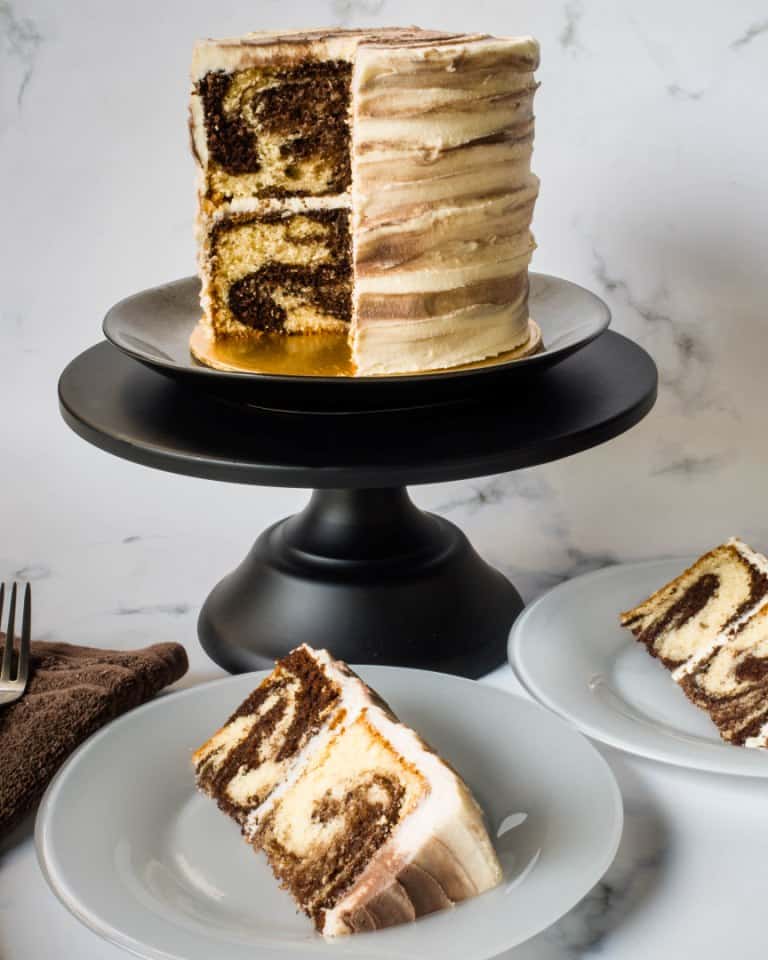
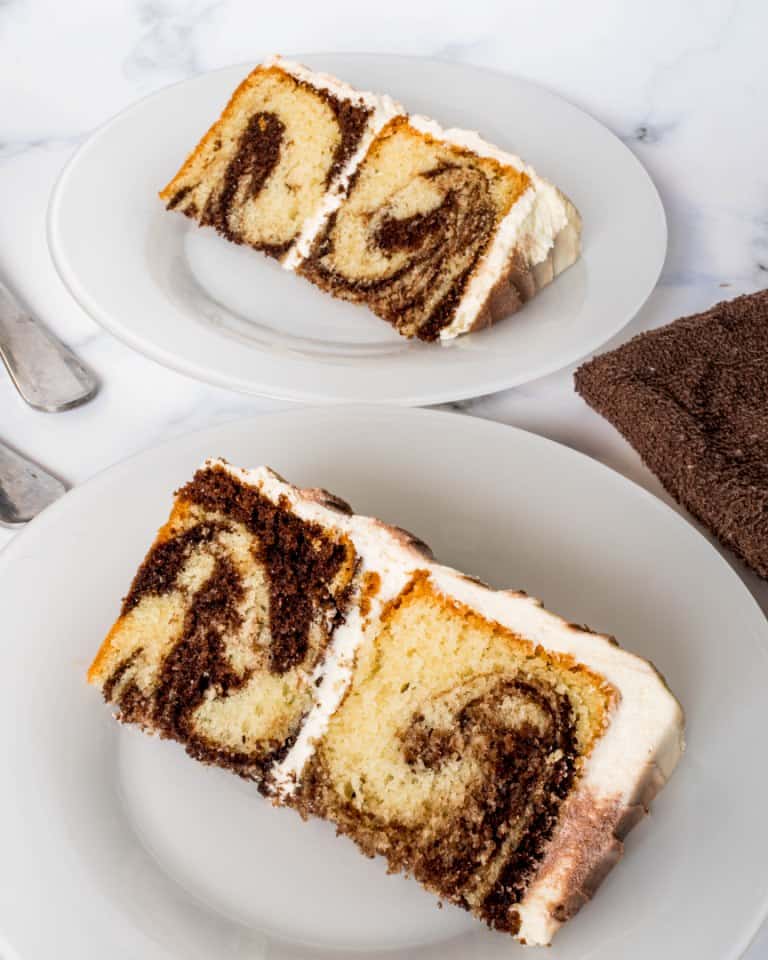
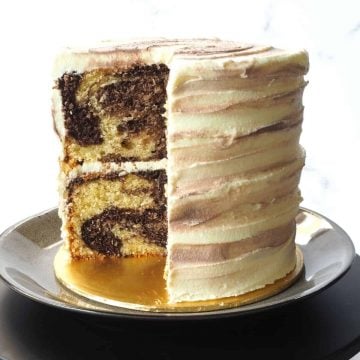
This chocolate marble pound cake recipe makes a deliciously soft and fluffy cake with pretty vanilla and chocolate swirls on the inside.
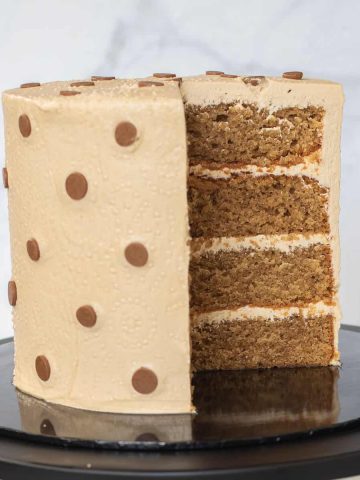
The cake is both irresistibly delicious and visually appealing. Baked into soft, moist and fluffy layers and frosted with chocolate and vanilla buttercream icing, this classic marble cake recipe not only makes a special treat for yourself but is also perfect for any special occasion.
This marble cake recipe is adapted from my pound cake recipe. To complete the cake, I frosted it with matching marbled buttercream icing which is adapted from my buttercream icing recipe.
Jump to:
❤️Why you will love this recipe
- It's easy to make, you only need simple ingredients.
- You get to learn how to create perfect marble swirls with step by step images.
- The cake is not only delicious on its own, it makes a great party cake with frosting. The combination of vanilla and chocolate flavors create a rich, indulgent taste that is hard to resist.
- You can use the marbling technique in this recipe to make a marble cake in any flavor combinations you like. My other pound cake recipes that can be used in making marble cake flavors that can be combined with plain vanilla pound cake flavor are orange pound cake, coffee pound cake, lemon pound cake, Earl grey pound cake and lime pound cake.
📋Ingredients
For the cake
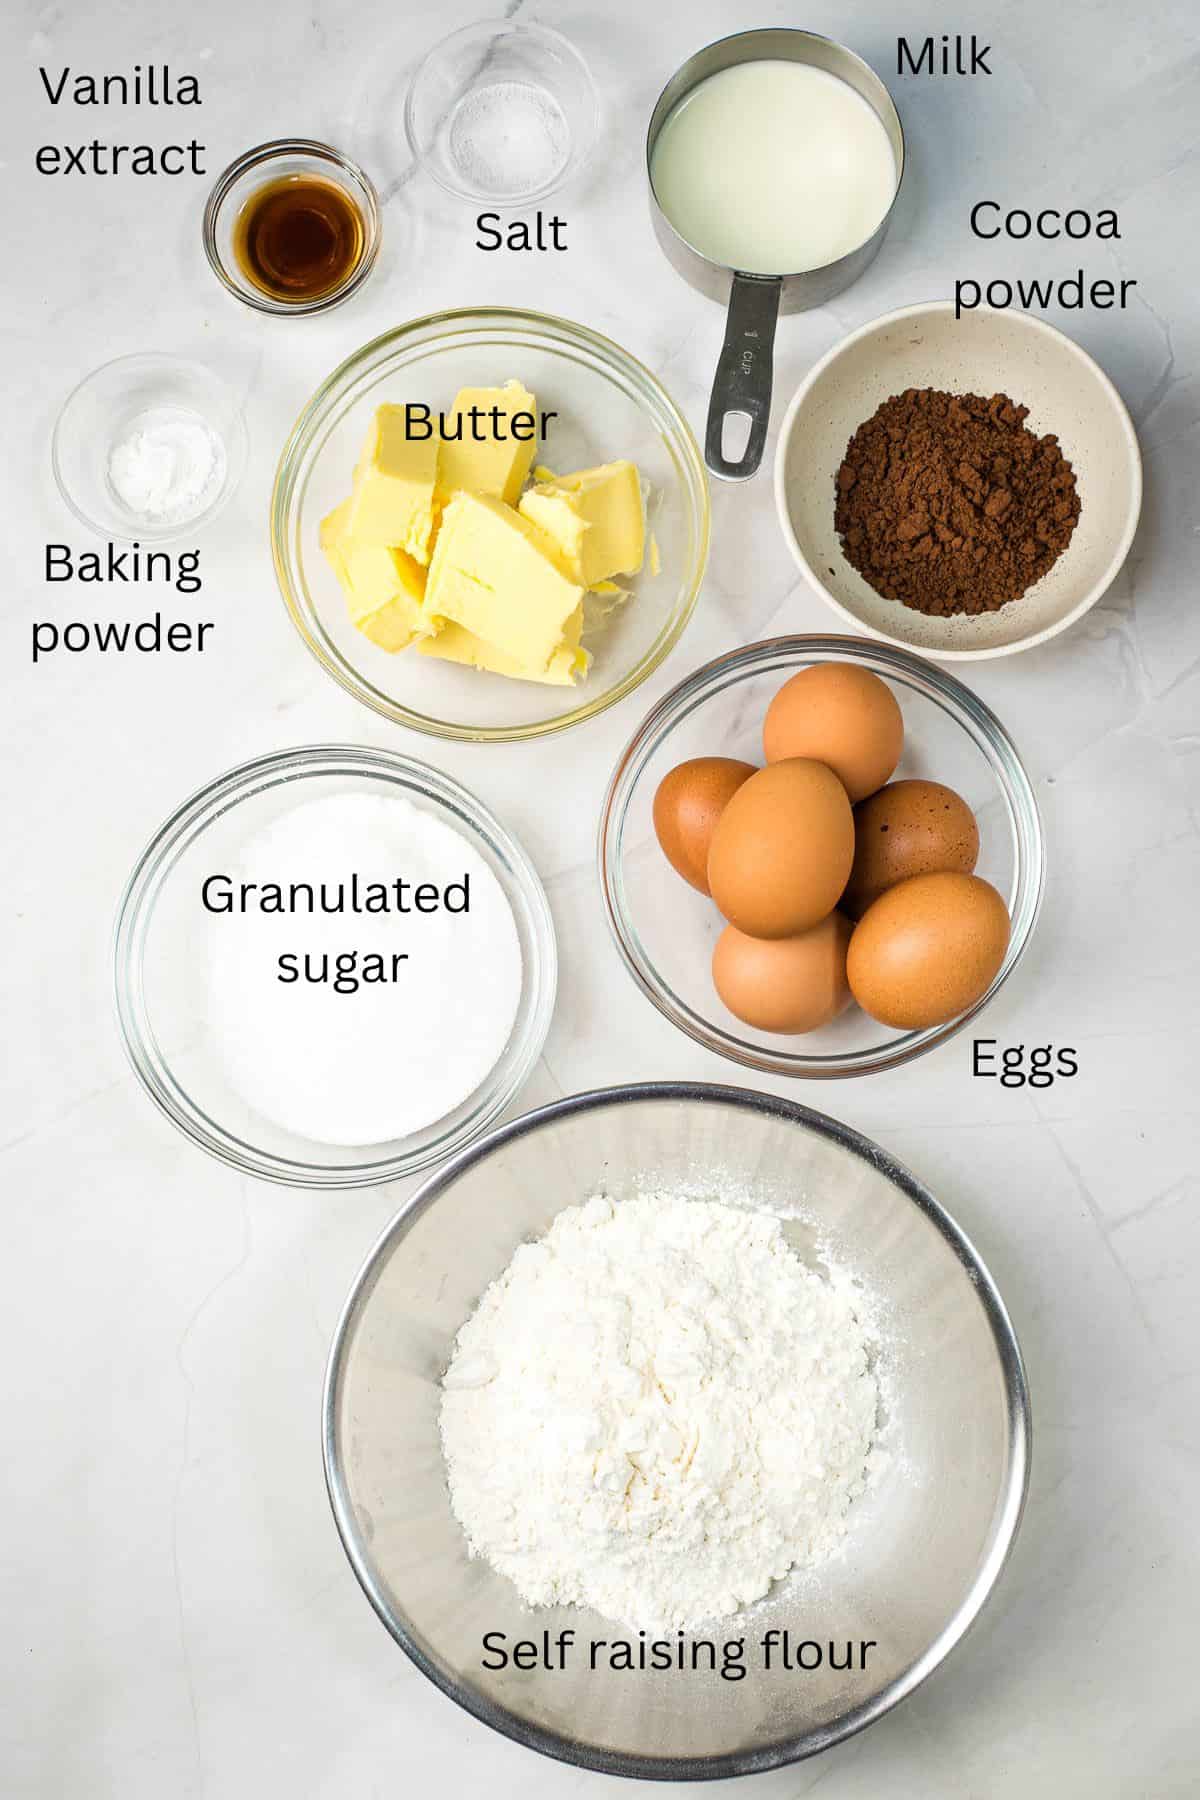
- Self raising flour + baking powder + salt - these are to be sifted together before added to the cake batter.
- Granulated sugar (caster sugar) - This is to be creamed with butter. Make sure it is granulated sugar and not coarse sugar. If you do not have granulated sugar, measure the coarse sugar and process it in a food processor to make it finer.
- Butter (salted) - I prefer to use salted butter in all my recipes. If you wish to use unsalted butter, add an extra one eighth teaspoon of salt in the recipe.
- Eggs - use large eggs.
- Whole milk - gives the cake a rich and moist texture. Milk should be at room temperature.
- Unsweetened cocoa powder - this is to make the chocolate batter for the marble cake. Make sure to sift first before using to break any lumps.
- Vanilla extract - adds a lovely aroma and flavoring for the cake.
For the marbled buttercream icing:
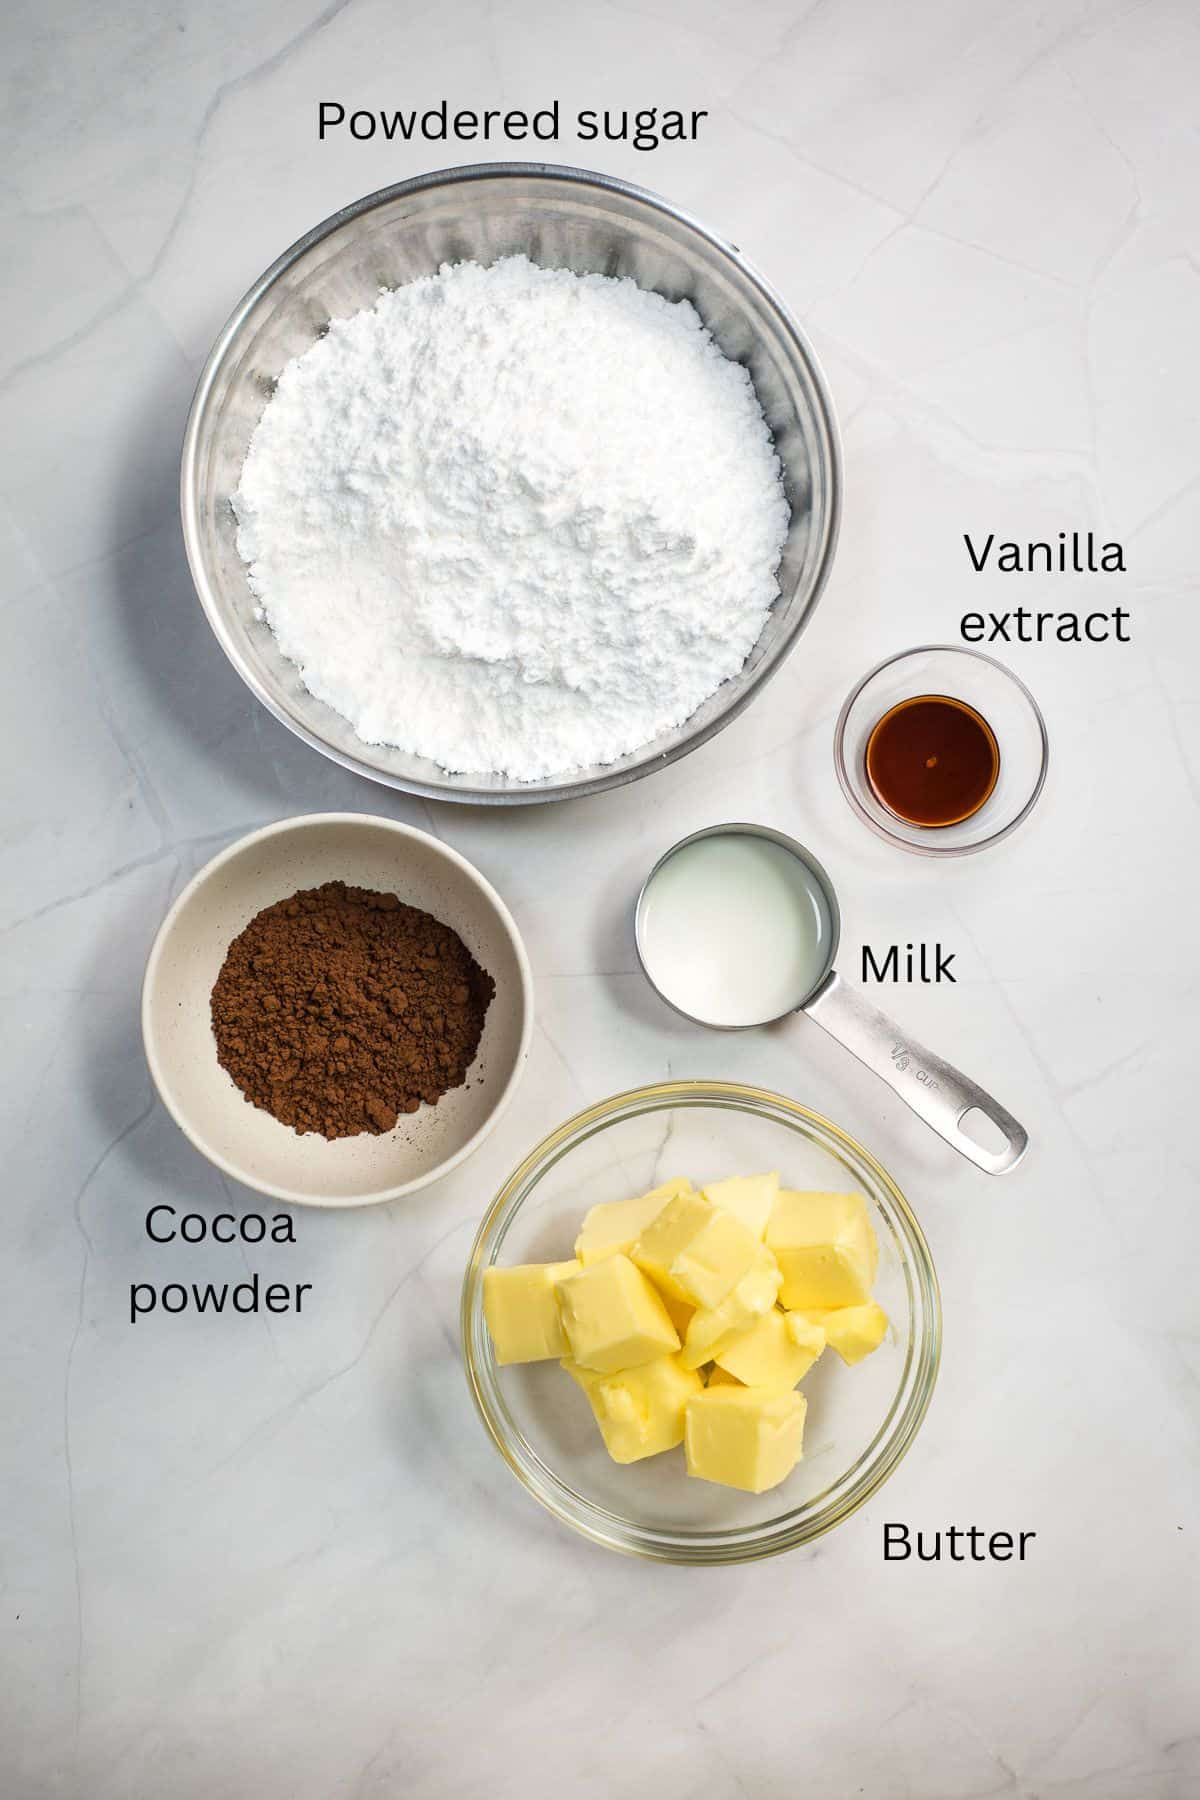
- Powdered sugar (Icing sugar) - If you do not have powdered sugar, process coarse sugar or granulated sugar until fine powder form and sift it.
- Butter (salted) - I prefer to use salted butter to make buttercream. The salt really makes a difference to the taste of the buttercream.
- Unsweetened cocoa powder - to make chocolate buttercream. Make sure to sift it first before using.
- Milk or heavy cream (optional) - this is only required if your buttercream is stiff. Given that butter is sensitive to heat, if you are in a hot country, your buttercream will be less stiff compared to if you are in a cold climate.
- Vanilla extract - for flavoring and aroma.
*Refer to the recipe card below for full list of ingredients and exact quantities. For best results, use a digital kitchen scale where applicable*
🧾Substitution and Variations
- If you do not have self raising flour, substitute with all purpose flour and baking powder. For every 225g of all purpose flour, add one and a half teaspoons of baking powder. Mix both well and sift them three times before using. For 360g of self raising flour (for the measurement provided in the recipe card below), substitute with 360g of all purpose flour and two and half teaspoons of baking powder.
- To make a chocolate marble loaf cake, half the recipe below and bake the cake in an 8 inches by 4 inches loaf pan. Swirl the batter in the prepared loaf tin (greased and floured) in the same way as the round cake tin.
- To make a marble bundt cake, half the recipe and bake the cake in a 6 cups capacity bundt tin at 160 degrees Celsius for 30 minutes. Do not fill the cake tin with batter until full. Leave some space (about ⅓ of the tin height) for the cake to rise.
- Buttercream can be replaced with other frosting of your choice like chocolate ganache or simple glaze drizzle.
This recipe has not been tested with other substitutions or variations. If you do try, please let me know in the comments section below!
👩🍳How to Make
Mixing the cake batter
- In a small bowl, sift the cocoa powder and mix it with some milk to form a thin smooth paste. Set aside.
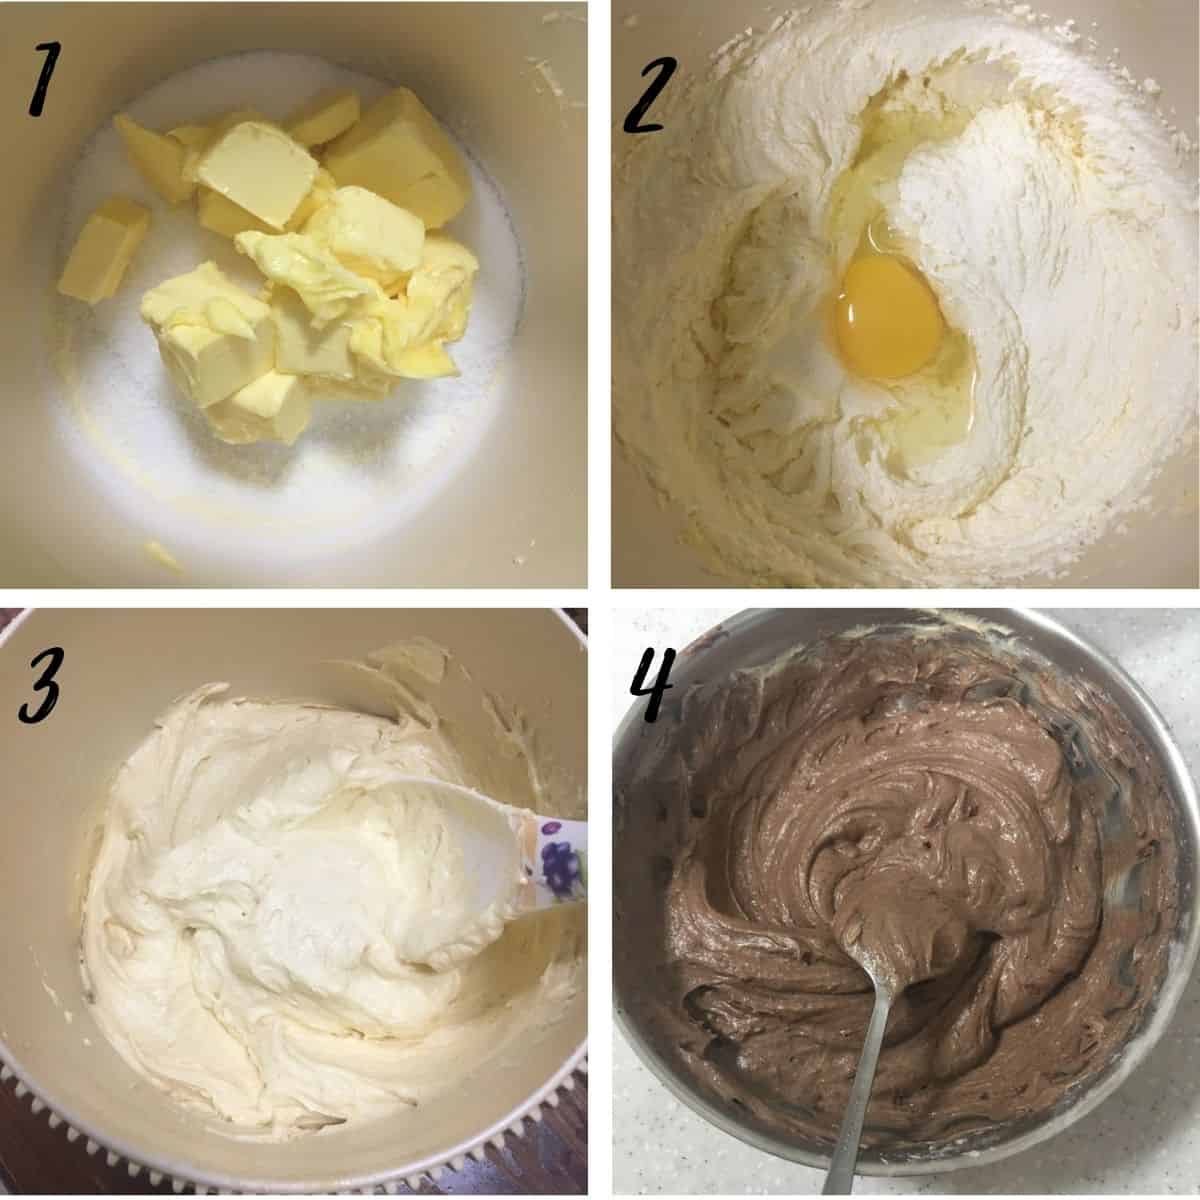
- In a separate large bowl of an electric mixer, beat the butter and sugar until light and fluffy. This should take a good 2 minutes on medium-high speed. Scrape the sides of the bowl and the bottom of the bowl (with a rubber spatula) at least once.
- Add the eggs next into the sugar butter mixture. Add them one at a time, and each time, beat until all the traces of the egg are no longer visible before adding more. For larger cakes, you can add 2 or 3 eggs at once. However, be sure to beat them well after each addition.
- Fold in the sifted flour (sift the flour with baking powder and salt) alternatively with milk into the creamed wet ingredients. Add the dry ingredients in 3 batches and the milk in 2 batches, starting and ending with flour.
- Finally, fold in the vanilla extract. Remove one-third of the batter into a separate bowl and add the cocoa powder-milk paste to it. Mix well to make chocolate cake batter.
Marbling the cake batter
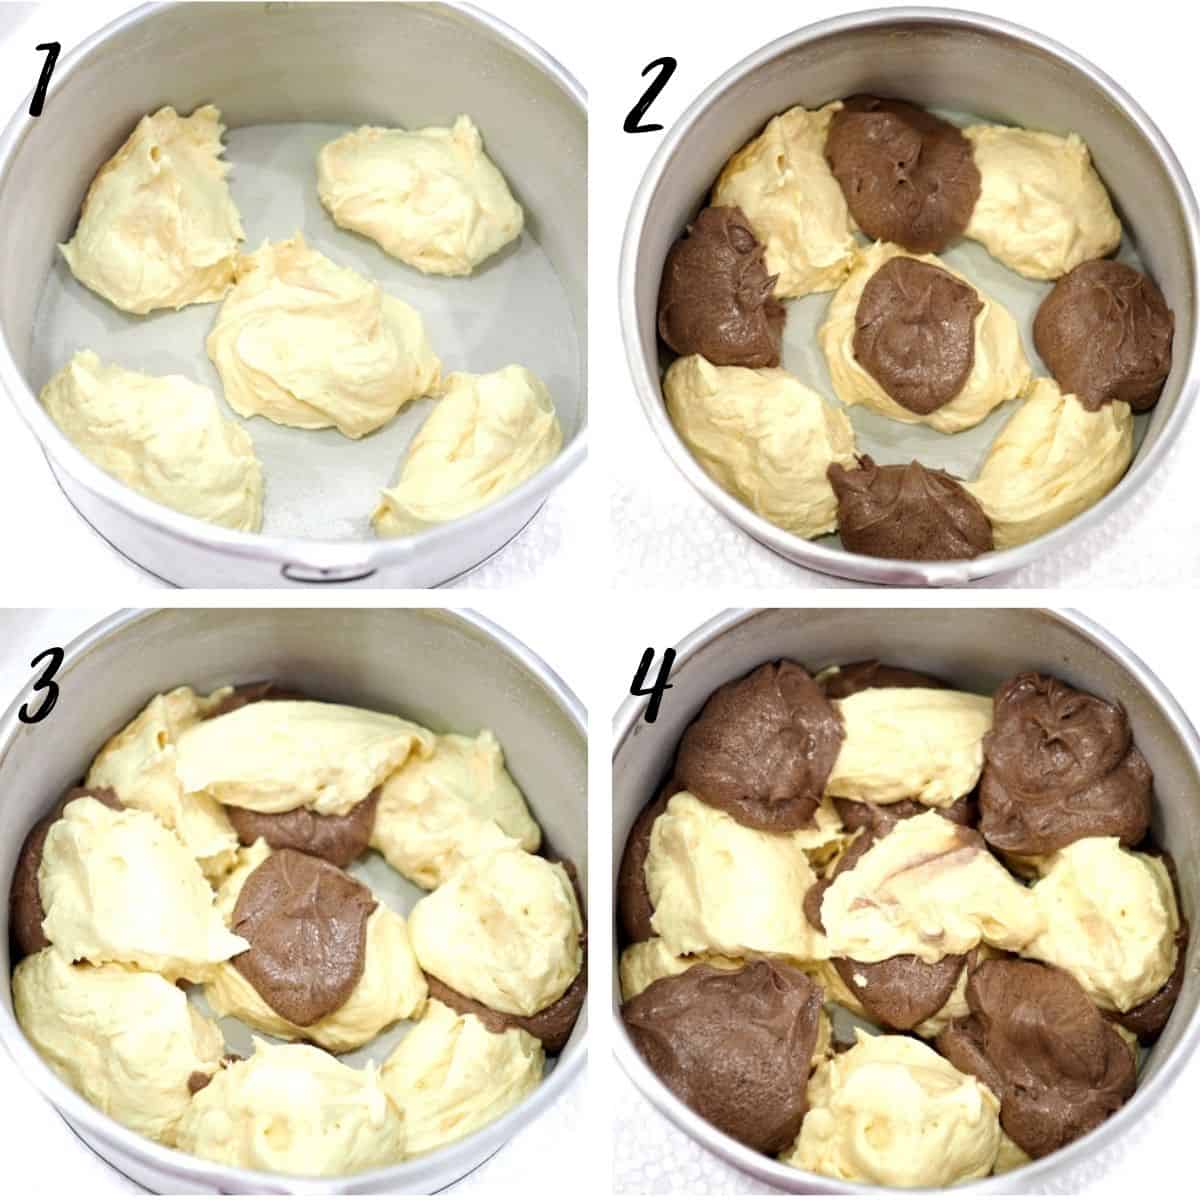
- In your greased and lined cake tins, drop a few spoonful of the plain vanilla batter.
- Next, drop a few spoonful of the chocolate batter. This time, fill in the gaps between the plain vanilla scoops.
- Once the first round is done, repeat the process with a second layer. This time, scoop the plain vanilla batter onto the earlier chocolate scoops. And the chocolate part onto the earlier plain vanilla cake batter.
- Continue with the alternate scooping until the batter is all used up for both the tins.
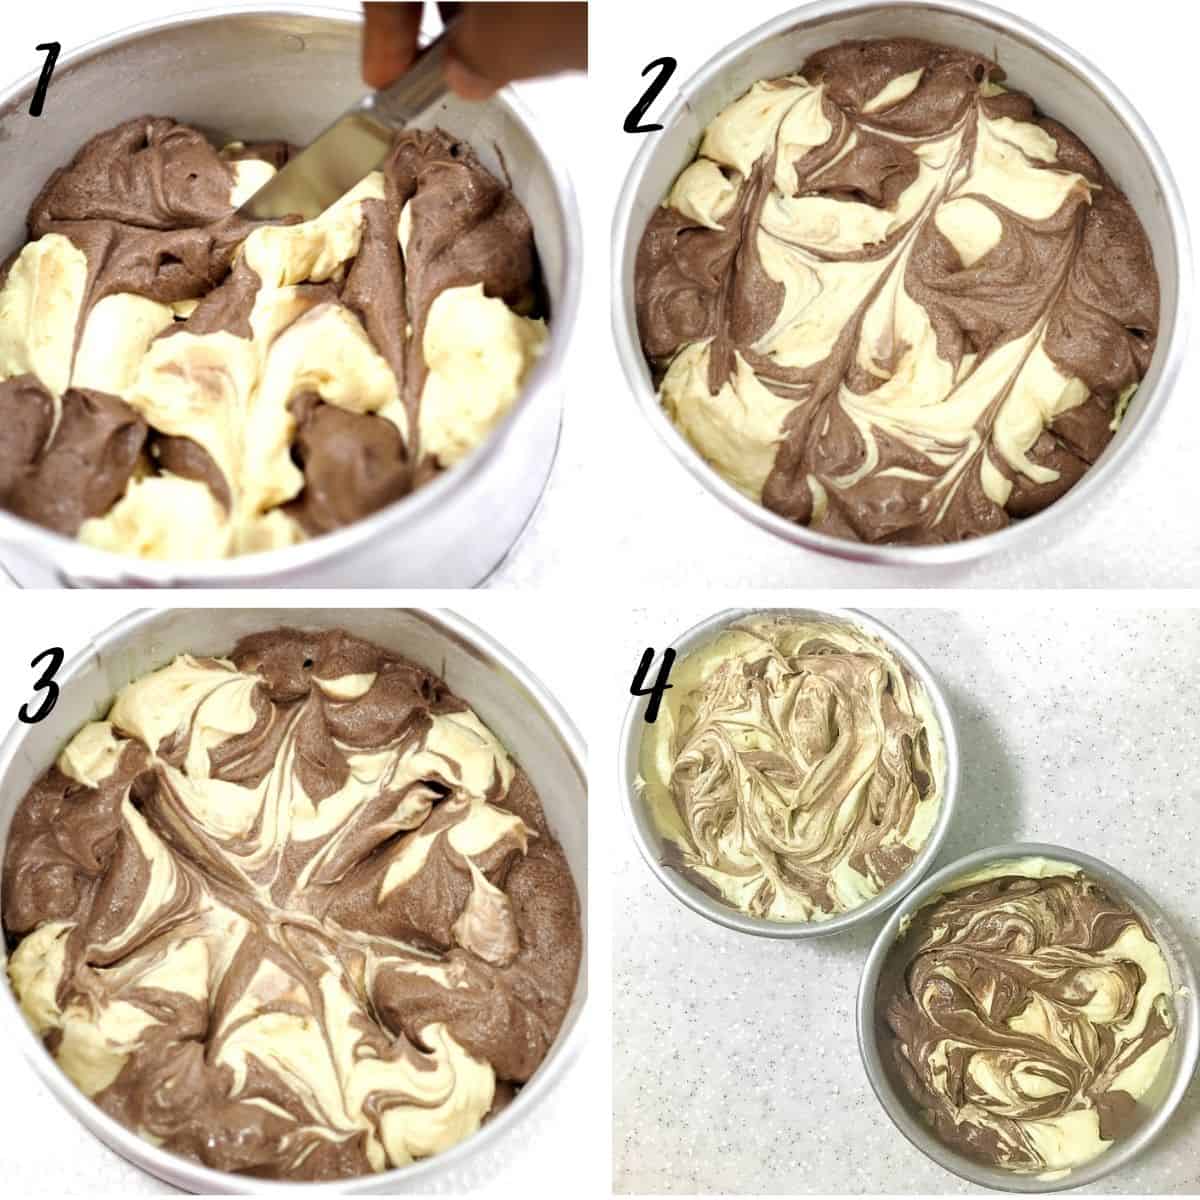
- Next is to create the marble effect. This is very simple, all you need is a butter knife or a long skewer.
- Use your butter knife or skewer to cut through the cake batter, in horizontal lines, with a gap of about 2 to 3 cm or more between each cut.
- Repeat the process with vertical lines, followed by diagonal lines. Each time you cut through, make sure your knife or skewer does not touch the base of your cake tin. After all the cutting through, you can see that the batter is all nicely marbled.
- Level the top of your cakes and bake them.
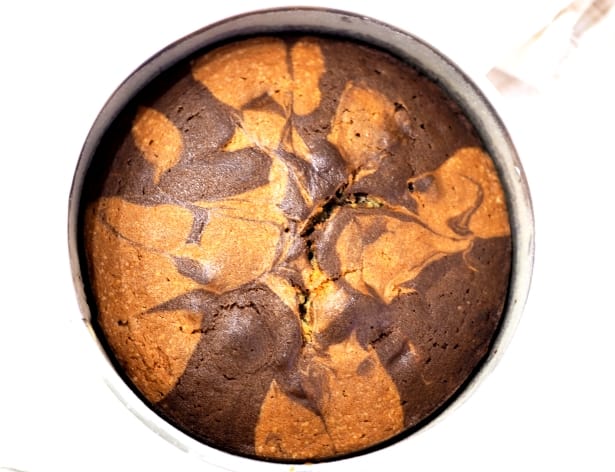
Here's how the baked marble butter cake would look like:
- Remove the cakes from the oven and let them rest in the cake pan for 2 minutes before loosening the sides with a jam knife and turning them out onto a wire rack (cooling rack) to cool.
Making the marble icing
- Start by making the vanilla buttercream. Cream butter and icing sugar (powdered sugar) in a large mixing bowl until light and creamy on medium speed. Add vanilla extract and some milk or cream if the buttercream is too stiff.
- Remove a quarter of the buttercream into a separate bowl (medium bowl). Sift in the cocoa powder and mix until the cocoa powder is all well distributed. Do not worry if the cocoa seems very light in the icing. It will take some time to intensify.
Assembling and decorating the cake with icing
- Level your marble pound cakes. Fill and sandwich them with some plain vanilla buttercream icing.
- Crumb coat the cake with a thin layer of buttercream icing and refrigerate for about 10 to 15 minutes for the crumb coat to set.
- Remove the marble cake from the fridge, and apply another coat of buttercream. Use your icing scraper to spread the icing on the sides and top of the marble pound cake. At this stage, you need not get the icing all smooth.
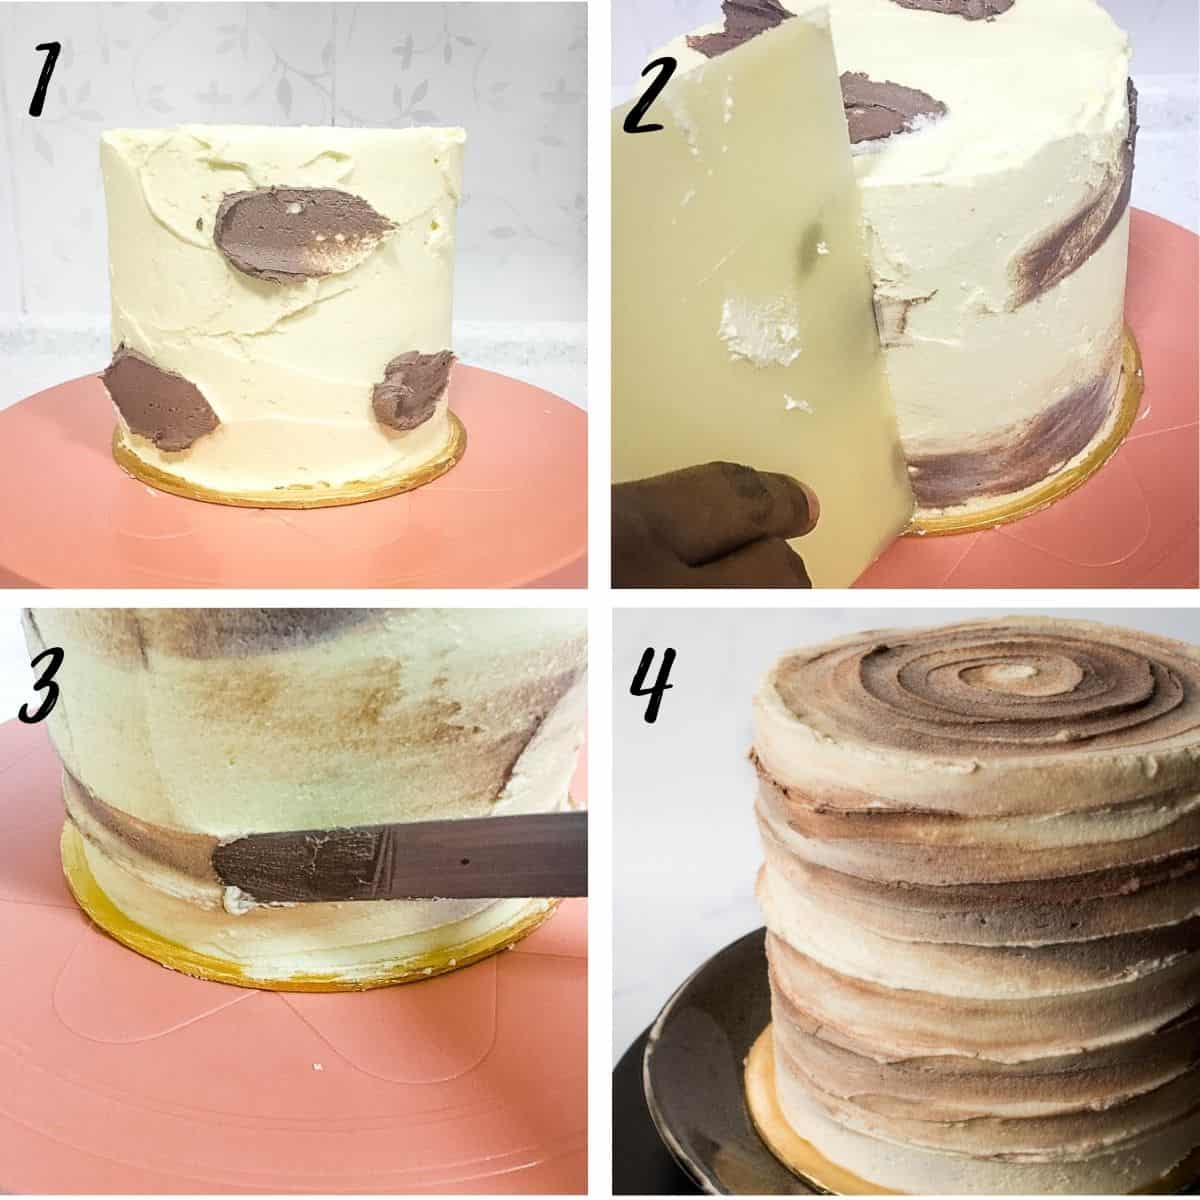
- Use a spatula to spread the chocolate icing randomly on the cake.
- Use your icing scraper again, to smooth the chocolate icing on the cake. As you do it, you will notice that the chocolate icing gets smeared and blended into the vanilla icing like a watercolor effect.
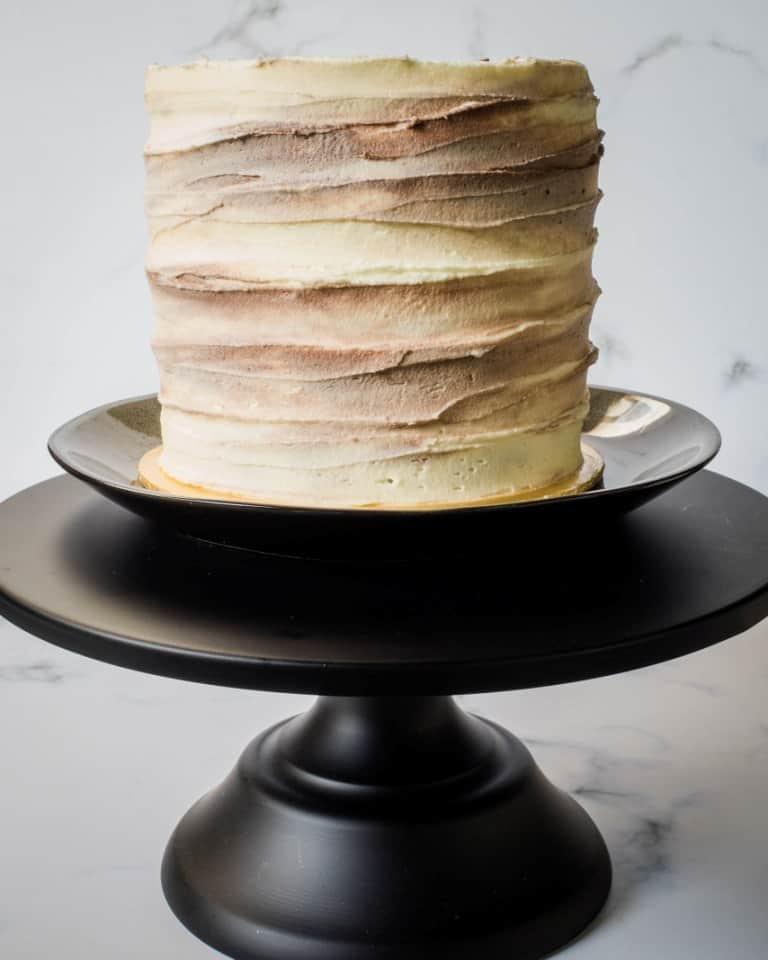
- Once the icing is generally smooth, it's time to make the horizontal lines pattern on the marbled buttercream cake. Place your marble cake on a turntable. Hold your palette knife at the bottom of the marble cake as shown.
- Slowly bring the knife up to the top of the cake without lifting it off the cake as you rotate your turntable with your other hand. In doing this, make sure not to press the palette knife too hard into the icing or you will end up scraping it off the cake. Suffice if it touches the icing lightly to create the slanting lines on the cake. Repeat the process to smooth out any bulges of icing you see on the cake in between the slanting lines created in the step above. Repeat the palette knife lines for the cake top, starting from the edges to the center of the marble pound cake.
And that's pretty much how you make the marbled effect with buttercream. Decorate the cake further if you wish, or serve it as it is for an elegant, rustic look.
🍽️Serving & storage
- This cake can be served on the very same day it is baked, even while it is still warm (without any frosting). It is also equally good when baked in advance and stored in the fridge until it is ready for use, within one week.
- To store the marble pound cake in the fridge, keep it in a covered, airtight container or wrap it with cling wrap (plastic wrap). This will avoid the cake from becoming dry.
- Leftovers of this marble pound cake can be stored at room temperature for a good 4 to 5 days provided it is handled without any moisture.
- Always ensure the knife used to cut the cake is all dry and the container you intend to store the cake has no traces of water in it.
- The leftovers can last up to one week if refrigerated. If you wish to use this cake for carving, the cake is best left to rest for at least one day after baking for the texture to stabilize for easy carving with fewer crumbs.
💡Expert Tips
- If the cake batter curdles after adding the eggs, it could be because the ingredients are not at room temperature. To prevent this, always use room temperature ingredients (eggs and butter). If the batter still curdles, do not worry. Add some flour and mix until it is no longer curdled before adding any liquid and bake your cake as usual.
- To make sure your cake is moist, follow this tips:
- Do not bake for too long. Check the cake 5 to 10 minutes before the time is up by inserting a skewer or a cake tester in the center of the cake. If the skewer comes out without any wet batter sticking to it, the cake is done and can be removed from the oven. Ideally, there should be moist crumbs sticking to your skewer.
- When cooling the cake on a wire rack, keep it covered with a kitchen towel.
- As soon as the cake has cooled down to a warm temperature, wrap it with a plastic wrap and refrigerate. Wrapping helps to lock and distribute the moisture in the cake. When removing from the fridge, leave the wrap on until it reaches room temperature to avoid direct condensation on the cake.
- If you intend to make large marble cakes (larger than 10 inches in diameter), use cake strips or a heating core. These will prevent the sides of the cakes from drying out due to longer baking time for larger cakes. See my post here on how to achieve leveled cakes to learn more about using cake strips and heating cores.
💭FAQs
Marble cake is a cake with 2 or more cake flavors combined in swirls in the cake. Typically it is made with vanilla and chocolate flavors.
The pattern of swirls created by the combination of the vanilla and chocolate cake batter in the cake is similar to that in a marble, hence the name marble cake.
Overbaking can cause the cake to be dry. Follow the baking time and test the cake with a skewer at least 5 minutes before the baking time is up. When cooling the cake, keep it covered with a kitchen towel.
If not using immediately, store the cake in an airtight container. This is help prevent the cake from becoming dry.
❤️More Recipes You Will Love
Do you like this recipe? Please leave a 5-star ⭐⭐⭐⭐⭐rating in the recipe card below and consider a review further down this page. I would love to hear from you. Thank you!
📖Recipe
Marble Pound Cake with Icing
For best results, use the metrics measurements. US customary measurements have not been tested and are only meant for guide.
Ingredients
Cake
- 360 g self raising flour
- 360 g granulated sugar
- 360 g butter at room temperature
- 6 eggs at room temperature
- 100 ml milk
- 15 g unsweetened cocoa powder
- 1 teaspoon vanilla extract
- ¼ teaspoon salt
- ¾ teaspoon baking powder
Marble Buttercream
- 300 g butter salted
- 600 g powdered sugar sifted
- 10 g cocoa powder sifted
- 2 tablespoon milk optional
- 1 teaspoon vanilla extract
Instructions
- Preheat oven to 170 °Celsius. Grease and line two 7-inches round cake tins.
- Mix cocoa powder with some milk to make a thin paste and leave aside.
- In a separate bowl, beat butter and sugar till soft and creamy.
- Add eggs, one at a time, beating well after each addition.
- In another separate bowl, sift flour, baking powder and salt. Fold in the sifted ingredients into the creamed mixture alternately with the remaining milk, starting and ending with flour.
- Finally add in vanilla extract and combine well.
- Transfer ⅓ of the batter into a separate bowl and add the cocoa paste to it. Mix well.
- Scoop the plain batter and chocolate batter alternately into 2 equal sized, well greased and floured cake tins.
- Bake the cakes for approximately 40 to 45 minutes until the top of the cake springs back when lightly pressed. The cakes are done when a skewer inserted in the center of the cake comes out without any wet batter.
- Remove cakes from oven and let them cool completely before frosting and decorating.
- Baking time may vary slightly for larger cakes.
- To make the buttercream, cream butter in a large bowl. Add the sifted powdered sugar and beat until the buttercream turns fluffy. Add vanilla extract and mix well.
- Remove a small amount of the buttercream into a separate bowl. Mix in the sifted cocoa powder. Add some milk if the icing is too stiff.
- To assemble the cake, fill each cake layer with the plain buttercream. Use the remaining icing to cover the sides and top of the cake. Smooth the buttercream.
- Use a spatula to spread the chocolate buttercream in random intervals on the sides and top fo the cake. Use an icing scraper to smooth the buttercream on the cake.
- Use a palatte knife to create horizontal lines on the sides of the cake and circular patterns on the top of the cake.
Notes
- Self raising flour can be substituted with all purpose flour. To make 360g of self raising flour, add two and half teaspoons of baking powder (in addition to the amount of baking powder indicated in the recipe card) to 360g of all purpose flour. Mix both well and sift them three times before using.
- To make a chocolate marble loaf cake, half the recipe below and bake the cake in an 8 inches by 4 inches loaf pan. Swirl the batter in the prepared loaf tin (greased and floured) in the same way as the round cake tin.
- To make a marble bundt cake, half the recipe and bake the cake in a 6 cups capacity bundt tin at 160 degrees Celsius for 30 minutes. Do not fill the cake tin with batter until full. Leave some space (about ⅓ of the tin height) for the cake to rise.
- Buttercream can be replaced with other frosting of your choice like chocolate ganache or simple glaze drizzle.
Calculated Tin Sizes
6 inches round/ 5 inches square (makes 2 layers of approximately 2 inch high cakes)- 240 g butter
- 240 g castor sugar
- 240 g self-raising flour
- 4 eggs
- 10 g unsweetened cocoa powder
- 65 ml milk
- ¾ teaspoon vanilla extract
- ⅛ teaspoon salt
- ½ teaspoon baking powder
- 480 g butter
- 480 g castor sugar
- 480 g self-raising flour
- 8 eggs
- 20 g unsweetened cocoa powder
- 135 ml milk
- 1 ¼ teaspoon vanilla extract
- ⅓ teaspoon salt
- 1 teaspoon baking powder
- 600 g butter
- 600 g castor sugar
- 600 g self-raising flour
- 10 eggs
- 25 g unsweetened cocoa powder
- 165 ml milk
- 1 ½ teaspoon vanilla extract
- ⅓ teaspoon salt
- 1 ¼ teaspoon baking powder
- 720 g butter
- 720 g castor sugar
- 720 g self-raising flour
- 12 eggs
- 30 g unsweetened cocoa powder
- 200 ml milk
- 2 teaspoon vanilla extract
- ½ teaspoon salt
- 1 ½ teaspoon baking powder
- 840 g butter
- 840 g castor sugar
- 840 g self-raising flour
- 14 eggs
- 35 g cocoa powder
- 235 ml milk
- 2 ¼ teaspoon vanilla extract
- ½ teaspoon salt
- 1 ¾ teaspoon baking powder
- 960 g butter
- 960 g castor sugar
- 960 g self-raising flour
- 16 eggs
- 40 g unsweetened cocoa powder
- 265 ml milk
- 2 ¾ teaspoon vanilla extract
- ⅔ teaspoon salt
- 2 teaspoon baking powder
- Larger cakes may take a longer time to bake.
- Use cake tins that are at least 3 inches high.
Holly
What will the cooking times be if we just use one tin and cut in half as not got two tins also what will it be on fan oven
Priya Maha
The cooking time will be the same when you cut the recipe into half and bake it in one tin. And I use a fan oven too, so you can follow the time and temperature provided in the recipe card.