

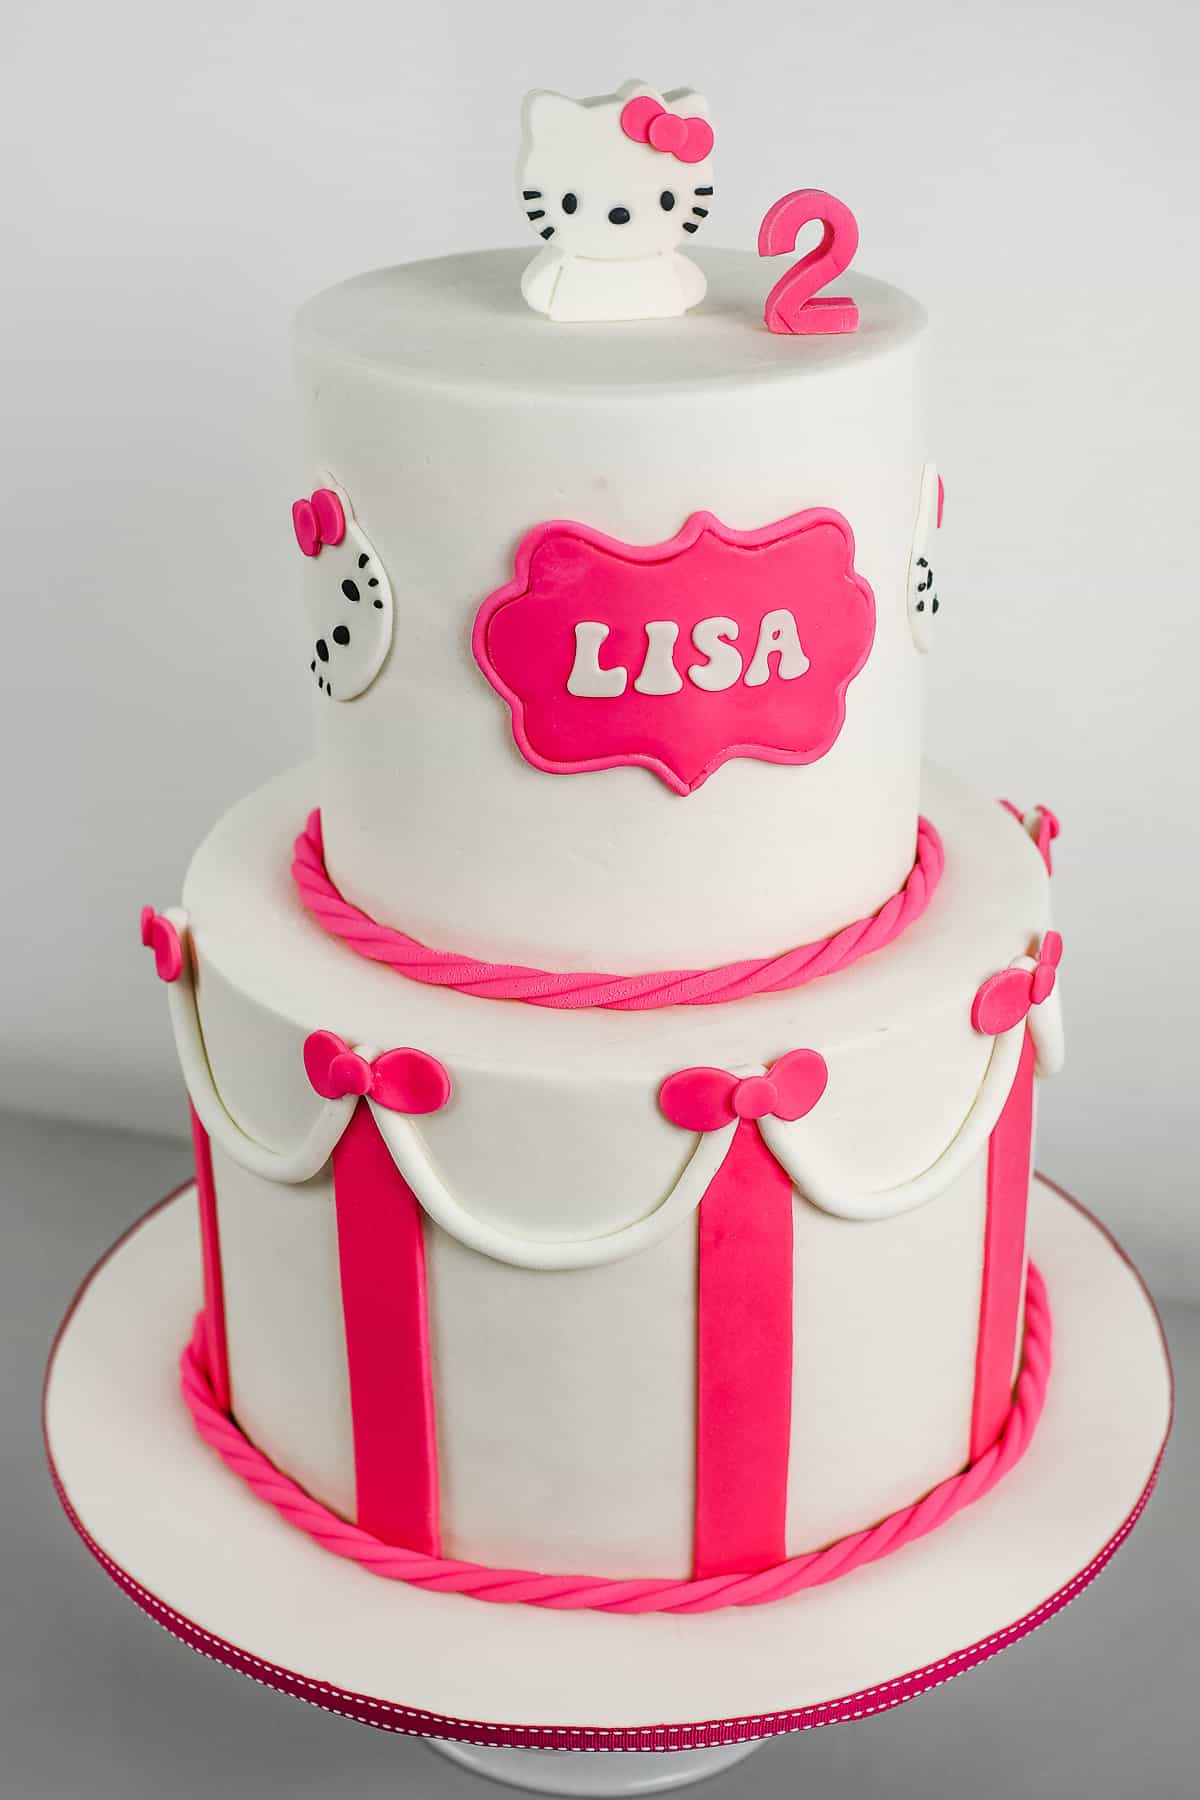
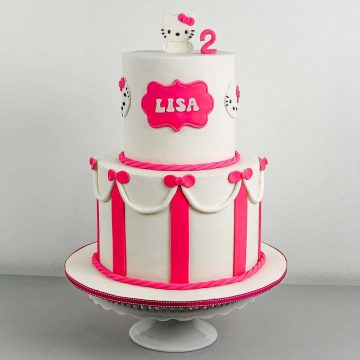
Hello Kitty fans would love this pink Hello Kitty birthday cake design. It is cute and pretty and easy to make too.
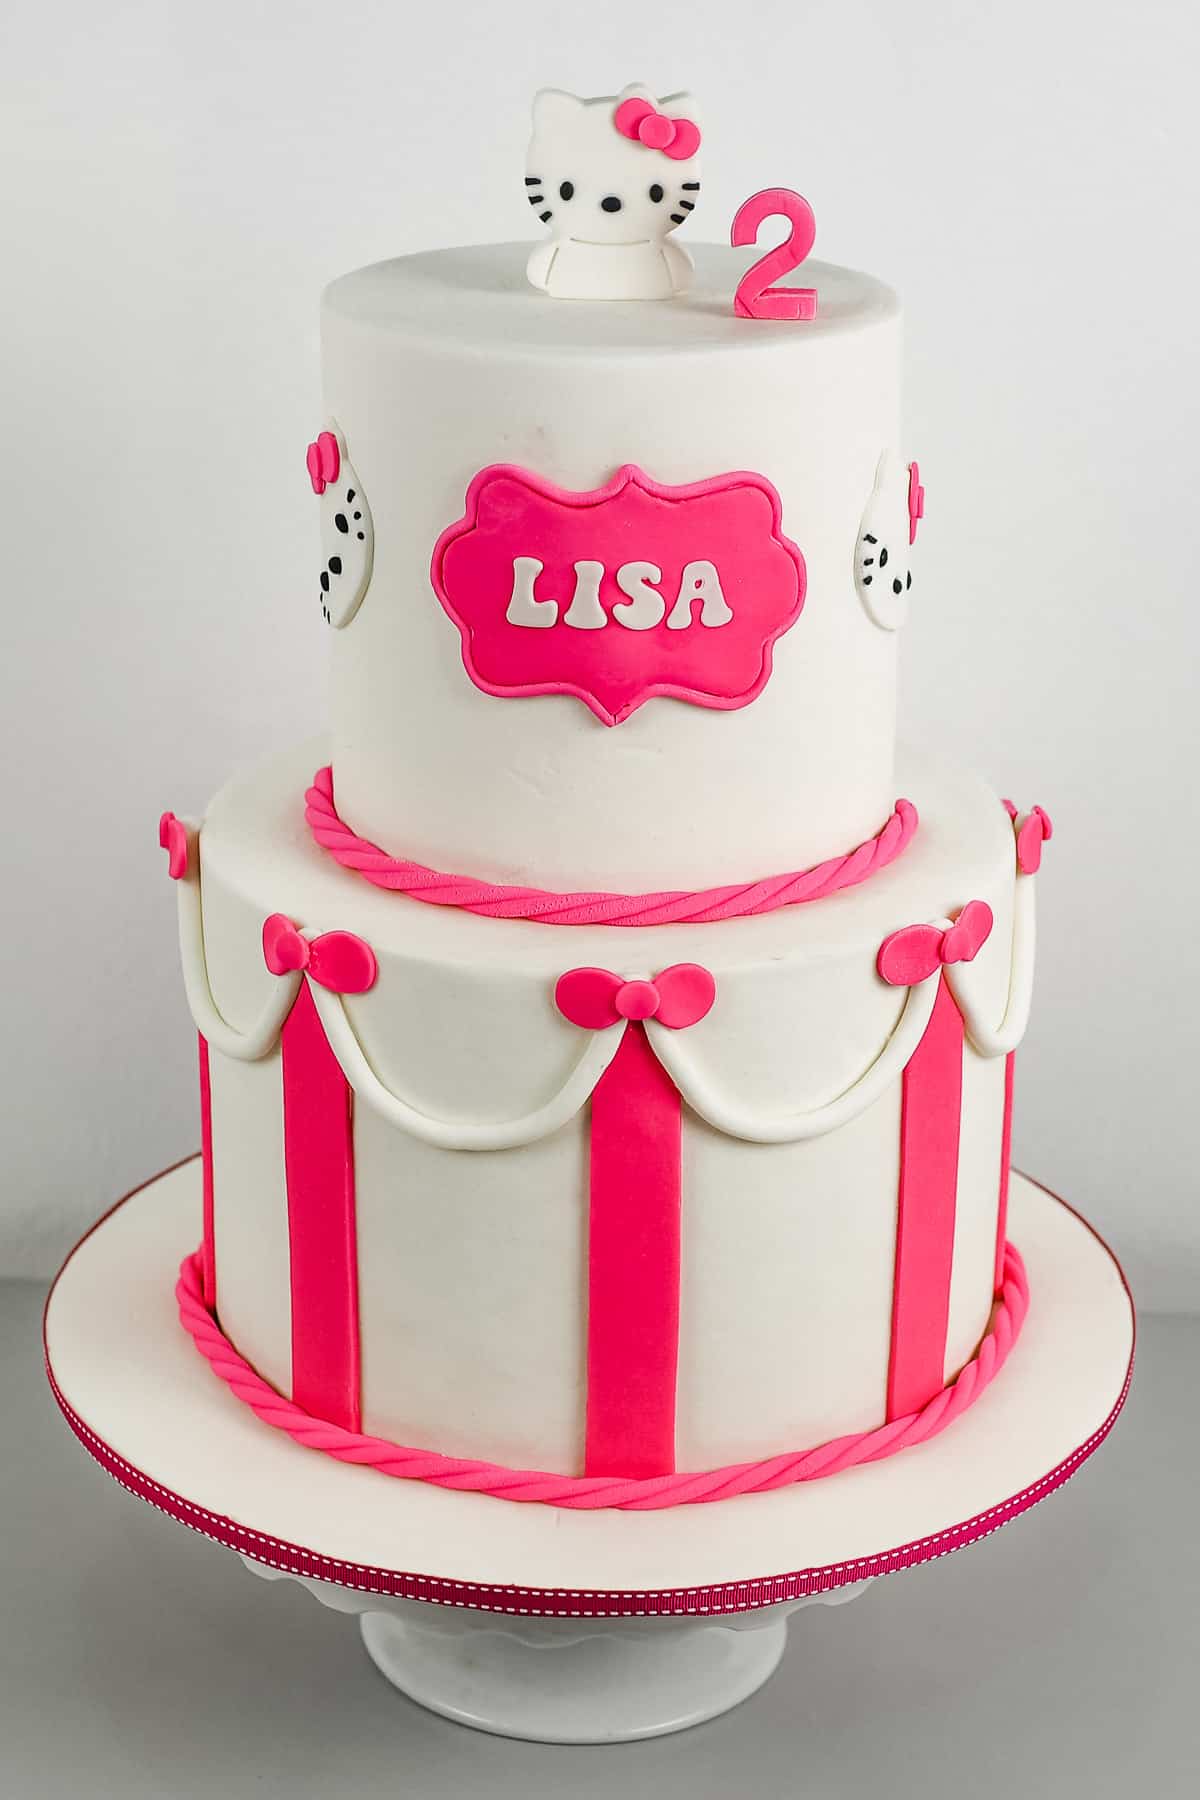
I made this for 2-year-old Lisa whose birthday theme was Hello Kitty. The mother requested for the cake to be in white and pink and so I made little Lisa a 2 tier birthday cake, all in white and pink (with occasional black that is part of Hello Kitty features).
If you like Hello Kitty, you should also check out this other Hello Kitty birthday cake. And for more birthday cake ideas, check out this doll cake, flower cake with 3D butterflies, two tier Minnie Mouse birthday cake and this unicorn cake.
🧾Supplies Required
- Cake – this was a 2 tier cake measuring 6 inches and 9 inches in diameter. Each tier was 6 inches high, so that made the total cake height to be 12 inches. I used my butter pound cake recipe to bake the cakes.
- Buttercream – I used buttercream to fill all the cake tiers as well as to crumb coat them.
- Fondant – the entire cake was covered in fondant. I used Satin Ice in white, pink and black .
- CMC powder – I added CMC powder to the Hello Kitty topper on the cake as well the number 2 topper on the cake. CMC helps the 3D fondant work to dry harder and firmer and therefore hold their shapes better.
- Shortening – I used shortening as the glue to stick fondant cut-outs on the cake.
- Fondant glue – I used this to stick the Hello Kitty topper and number ‘2’ topper on the cake.
- Hello Kitty cutters – I used 2 different Hello Kitty cutters in this project. The first one was slightly larger and had Hello Kitty image up to its chest. The second one was just Hello Kitty’s face. I used the larger one for the cake topper while the smaller one for the 2D Hello Kitty faces for the sides of the top tier cake. Both these set had tools to emboss the facial features of Hello Kitty.
- Scallop paper template – I drew this template by hand to guide me in attaching the pink vertical strips as well as the white scallops all around the bottom tier of the cake.
- Pizza cutting wheel
- Clikstix alphabet cutter – this was for the birthday girl’s name.
- Number ‘2’ cutter.
- Plaque cutter – I used this for the pink name plaque.
- Extruder tool – I used 2 different disc patterns for this project. One is a small plain round disc for the name plaque border. The other is a 3 combined holes disc for the rope borders of the cake.
- Teardrop plunger cutter and round plunger cutter – these were used to make Hello Kitty’s bows on the cake.
👩🍳How to Make
Step 1: Bake and Prepare the Cakes
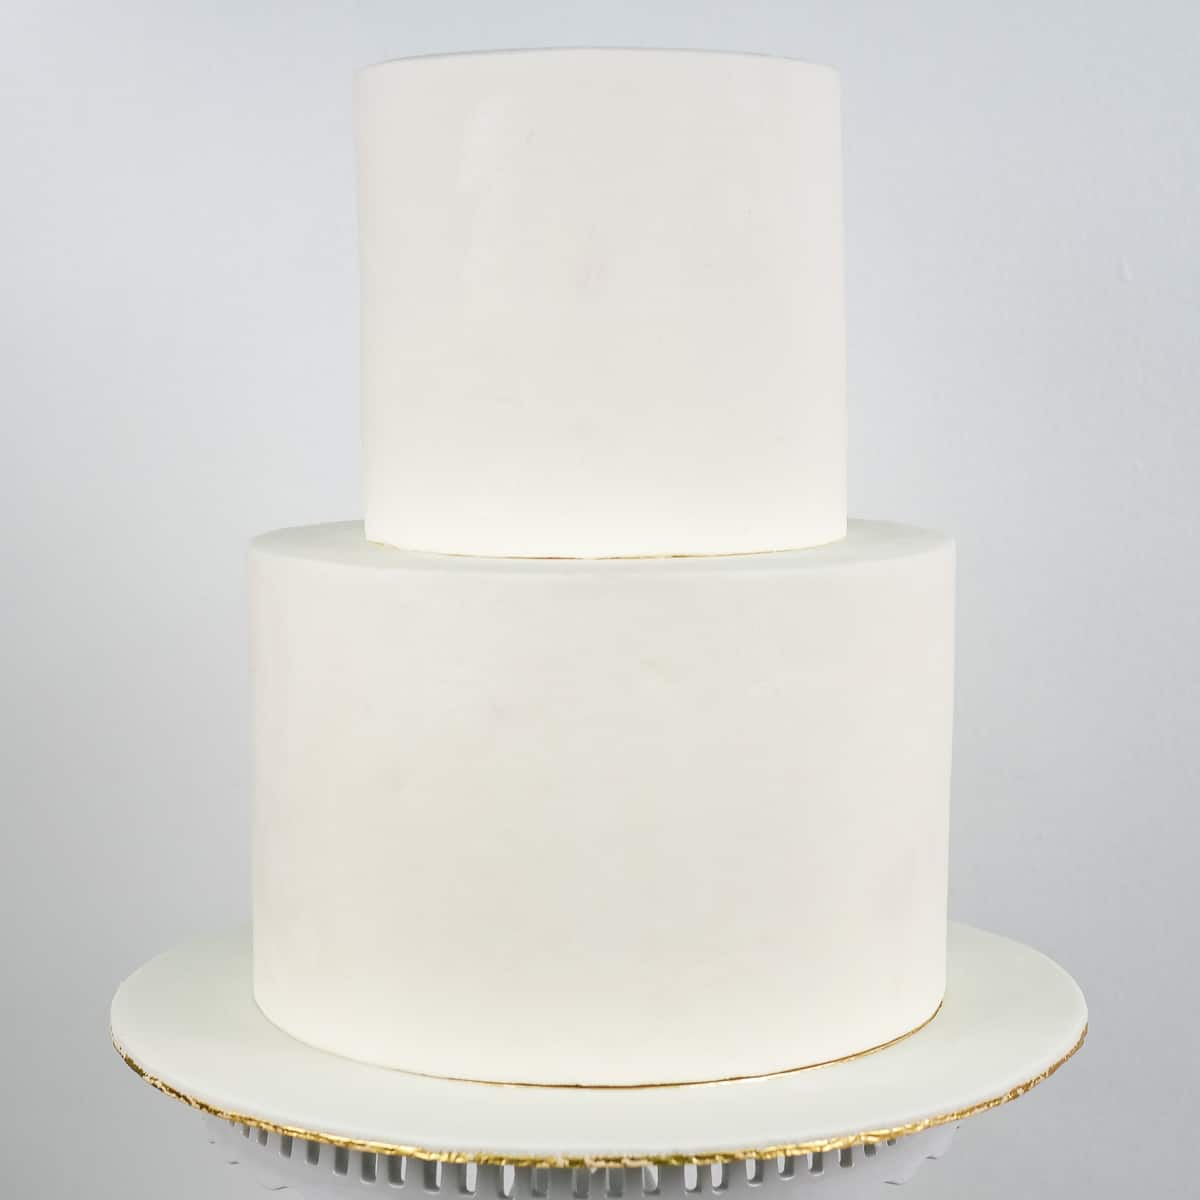
Since there were no major fondant deco on the Hello Kitty birthday cake that needed to be prepared in advance, I started the entire cake decorating process by baking the cakes first.
Once the cakes have cooled down, I leveled and filled them with buttercream. And then I crumb coated them with buttercream before covering them with white fondant.
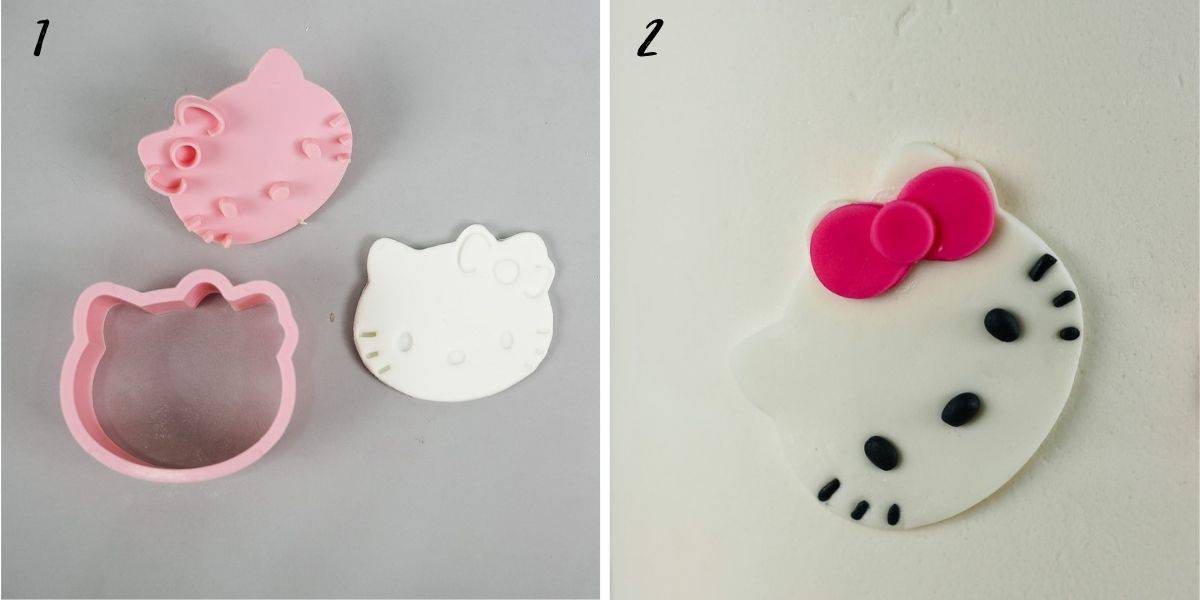
Step 2: Make the Hello Kitty Cake Topper and Number 2 Topper
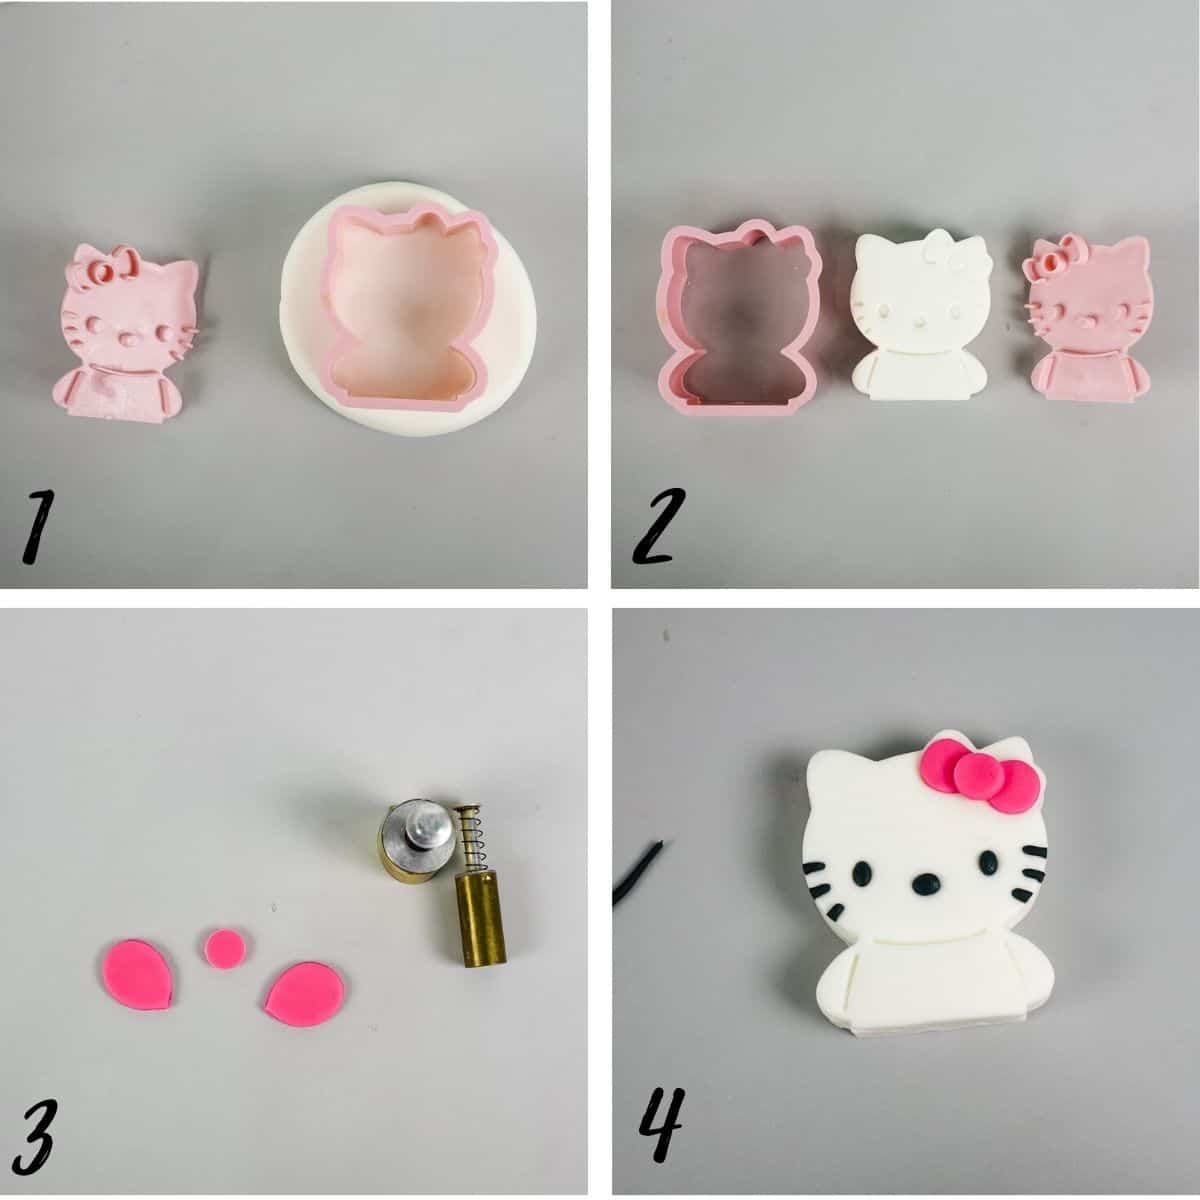
Next, I made the Hello Kitty cake topper and the number ‘2’ topper. I added some CMC to white fondant, kneaded it well and then rolled it to about 1cm thickness. I used my larger Hello Kitty cutter for the topper (image 1)
And then, while the fondant was still inside the cutter, I used the embossing part of the cutter to imprint Kitty’s facial features and bow on the fondant. And then I removed both the cutter and embossing tool (image 2).
For the bow, I used my teardrop and round plunger cutters to make 2 teardrops and one small circle of fondant and attached them on Kitty as its bow (image 3).
Next, I added all the facial features. To do this, I used black fondant, rolled them into tiny black oval balls and attached them to the face. For the whiskers, I rolled some black fondant into really thin ropes and attached them to the sides for whiskers. Once that was done, I left Kitty aside to firm up (image 4).
As for the number topper, again, I added a little CMC to pink fondant and cut the number out with my number ‘2’ cutter. This too was left aside to firm up while I worked on the rest of the Hello Kitty birthday cake decoration.
Step 3: Attach the Pink Stripes on the Cake
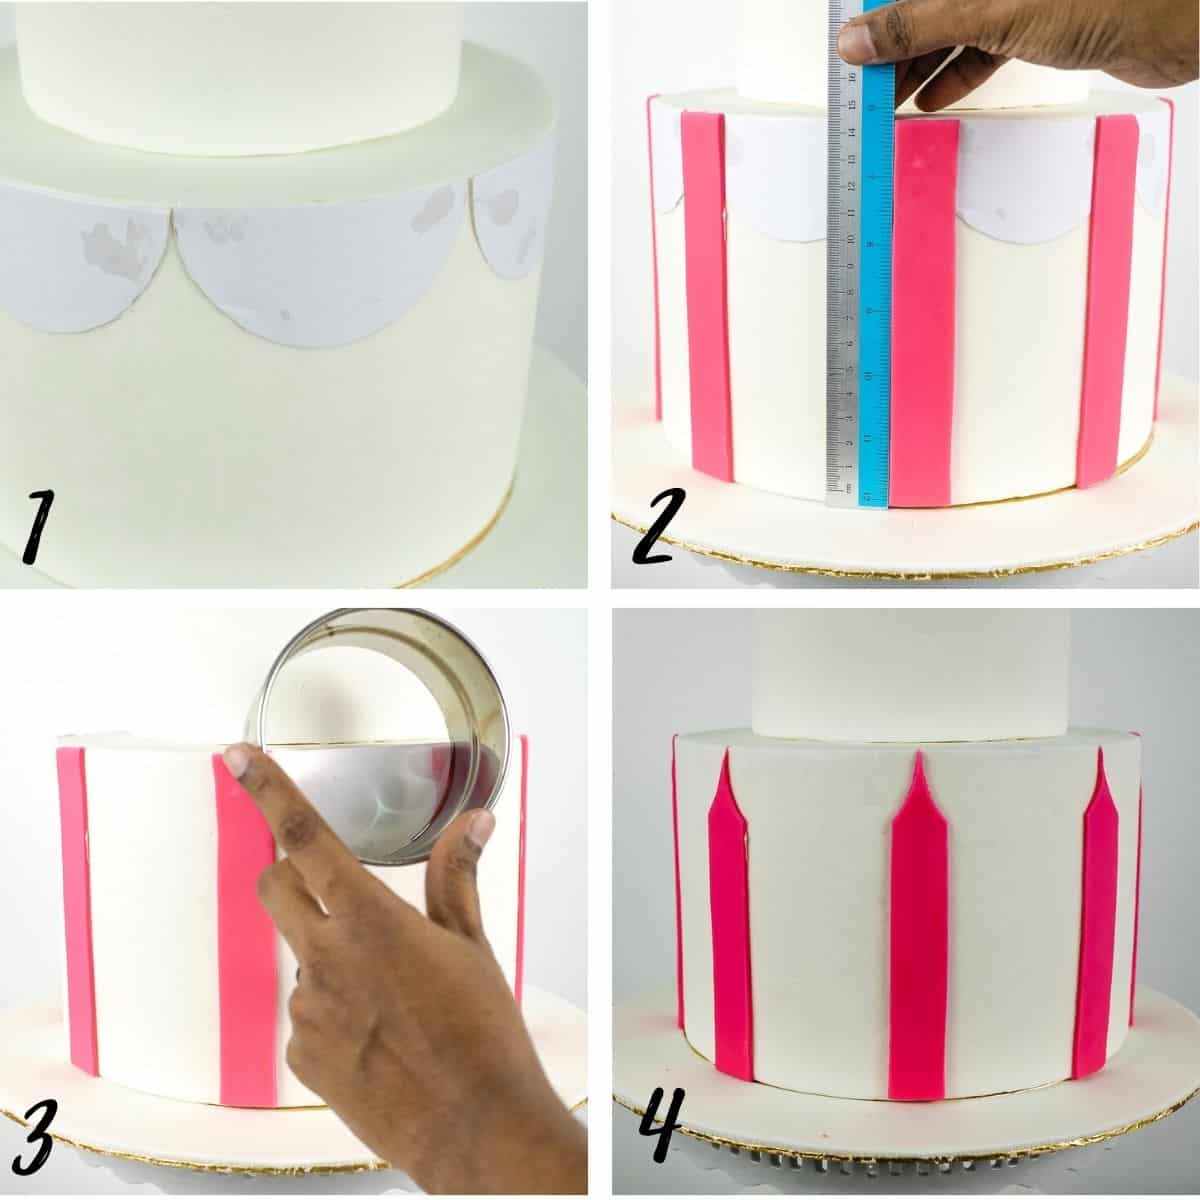
To ensure I had the strips and scallops consistently spaced out all around the birthday cake, I started by measuring the diameter of the cake. Once I had the diameter, I divided it into equal sections. I measured the width of each section and drew a circle (with a round cutter as a guide) with a diameter that matched the width of the sections. And then I cut the circle into half to make the semi circle template for the cake. I made a few copies of the semi circle templates (image 1).
Next, I attached my paper templates all around the cake with shortening. And then I attached the pink stripes to the cake (also with shortening), right at the intersections of each of the semi circles. To make sure the stripes were perfectly straight, I used a ruler to push them to straight lines (image 2).
And then, using the round cutter that I used to draw my paper templates earlier, I cut the top of each pink strip to a pointed end. When cutting, apply light pressure and try to leave the semi circle marking on the white fondant to help with the white fondant scallops in the next step (image 3).
Remove all the paper templates (image 4).
Step 4: Add the White Scallops and the Pink Bows
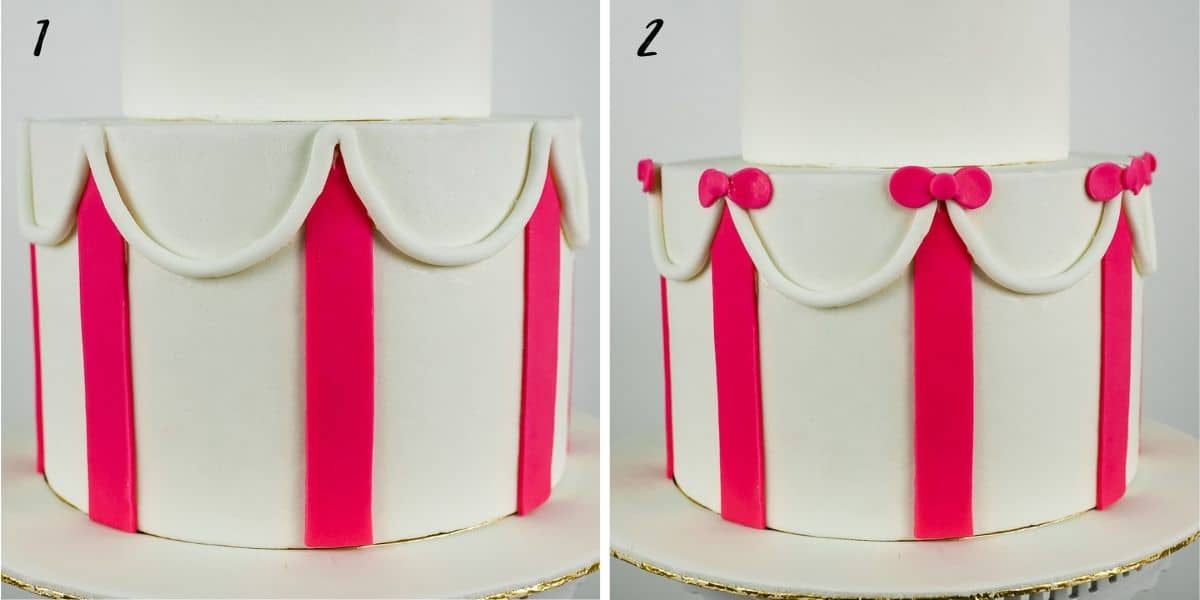
Next were the white scallops for the Hello Kitty birthday cake. I used the marking on the white fondant (made with the cutter when cutting out the pink strips in the step above) as a guide to attach the scallops. That way I was able to get perfectly consistent scallops all around the cake (image 1).
Next to go on the bottom tier of the Hello Kitty birthday cake were the Hello Kitty bows. I made them in the same way, I did for the Kitty topper and attached them all around the cake (image 2).
Step 5: Add the Name
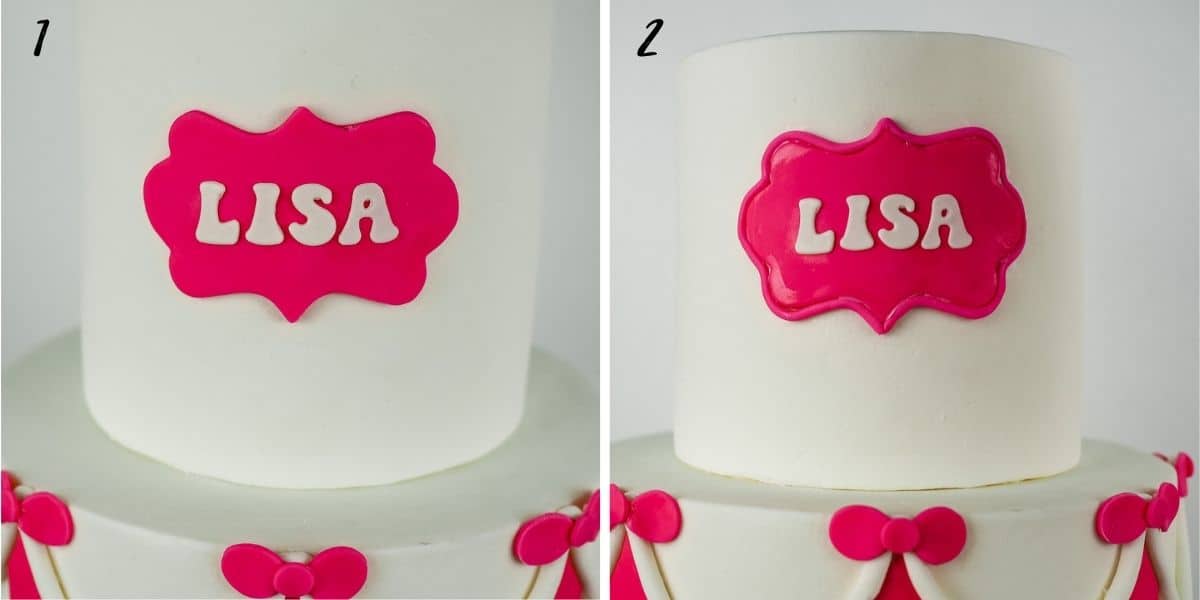
For the top tier of the Hello Kitty birthday cake, I started by putting the birthday girl’s name on first. I cut out the letters in white fondant and attached them to a pink fondant plaque with shortening. I attached the plaque to the front side of the cake and then added a border to it in the same pink fondant (image 1).
The border was piped using my extruder tool and attached to the sides for the plaque with shortening (image 2). I have prepared a separate tutorial on how to get your wordings on your cake well centered and you can read all about it here.
Step 6: Make the 2D Hello Kitty Face Design
Back to the cake. Once the lettering was done, I attached Hello Kitty's faces all around the cake. I cut these using my smaller Hello Kitty face cutter and attached them to the cake with shortening (image 1).
The eyes, nose, whiskers and bow was done is the same way I did for the 3d Hello Kitty cake topper (image 2).
Step 7: Add the Cake Border and the Final Touches

Next, I piped out long strips of pink fondant ropes using my extruder tool, twisted it to make it look like a rope and attached it around the base of both tiers as the border for the Hello Kitty birthday cake (image 1).
And finally, I added both the Hello Kitty cake topper and the number 2 topper on the Hello Kitty birthday cake with the help of some fondant glue (image 2).
With that, the Hello Kitty birthday cake was complete.
❤️More Tutorials You Will Love


Do you like this tutorial? Please leave a 5-star ⭐⭐⭐⭐⭐rating in the recipe card below and consider a review further down this page. I would love to hear from you. Thank you!
📖Recipe
Hello Kitty Birthday Cake Design
Equipment
- Hello Kitty cutters
- Scallop paper template
- Pizza cutting wheel
- Clikstix alphabet cutter
- Number ‘2’ cutter
- Plaque cutter
- Extruder tool
- Teardrop plunger cutter and round plunger cutter
For best results, use the metrics measurements. US customary measurements have not been tested and are only meant for guide.
Ingredients
Cake 1 (6 inches round)
- 420 g self-raising flour
- 420 g granulated sugar
- 420 g butter at room temperature
- 7 eggs at room temperature
- 105 ml milk
- ¾ teaspoon baking powder
- ⅔ teaspoon salt
- 1 ¼ teaspoon vanilla extract
Cake 2 (9 inches round)
- 600 g butter
- 600 g granulated sugar
- 600 g self-raising flour
- 10 eggs
- 150 ml milk
- ½ teaspoon salt
- 1 ¼ teaspoon baking powder
- 1 ⅔ teaspoon vanilla extract
Frosting and Decoration
- Buttercream
- Fondant
- CMC powder
- Shortening and fondant glue
Instructions
Baking the cakes (you may need to bake the cakes in 2 batch due to the volume).
- Preheat oven to 170 °Celsius.
- Beat butter and sugar till soft and creamy for about 2 minutes. Add eggs, one at a time, beating well after each addition.
- In a separate bowl, sift flour, baking powder, and salt. Fold in the sifted ingredients into the creamed mixture alternately with milk, starting and ending with flour.
- Finally, add in vanilla extract and combine well. Pour batter into well greased and floured cake pans and bake for 45 to 50 minutes until the top of the cake springs back when lightly pressed. The cakes are done when a skewer inserted in the center of the cake comes out without any wet batter.
- Remove cakes from oven and let them cool completely before icing and decorating.
- Once the cakes have cooled down, level and fill them with buttercream. And then crumb coat them with buttercream before covering each tier with white fondant.
Hello Kitty cake topper and Number 2 topper
- To make the Hello Kitty cake topper, add some CMC to white fondant, kneaded it well and then roll it to about 1cm thickness. Use the larger Hello Kitty cutter to cut out the Kitty.
- And then, while the fondant is still inside the cutter, use the embossing part of the cutter to imprint Kitty’s facial features and bow on the fondant. And then remove both the cutter and embossing tool.
- For the bow, use the teardrop and round plunger cutters to make 2 teardrops and one small circle of fondant in pink and attach them onto Kitty's face as its bow.
- Next, add all the facial features. To do this, use black fondant. Pinch tiny pieces and roll them into tiny black oval balls and attach them to the face. For the whiskers, roll some black fondant into really thin ropes and attach them to the sides for whiskers. Once that was done, leave the Hello Kitty cake topper aside to firm up.
- As for the number topper, again, add a little CMC to pink fondant and cut the number out with a number ‘2’ cutter. Similar to the Hello Kitty cake topper, leave this number 2 topper aside to firm up while you work on the rest of the cake decoration.
The pink stripes on the birthday cake
- To ensure the stripes and scallops consistently spaced out all around the cake, measure the diameter of the cake. Divide the diameter into equal sections. The width of each section will determine the intervals of your pink stripes. Measure the width of each section and draw a circle (with a round cutter as a guide) with a diameter that matches the width of the sections. And then cut the circle into half to make the semi circle template for the cake. Make a few copies of the semi circle templates.
- Next, attach the paper templates all around the cake with shortening. Roll pink fondant thin and cut it into strips. Attach the pink stripes to the cake (also with shortening), right at the intersections of each of the semi circle templates. To make sure the stripes are perfectly straight, you can use a rule to adjust them, by pushing them gently into straight lines.
- And then, using the round cutter that you used to draw the paper templates earlier, cut the top of each pink stripe to a pointed end. When cutting, apply light pressure and try to leave the semi circle marking on the white fondant to help with the white fondant scallops in the next step.
- Remove all the paper templates.
The white fondant scallops and pink fondant bows
- Use the extruder tool to pipe out long strip of white fondant. Attach it to the cake as the scallops. Use the marking on the white fondant (made with the cutter when cutting out the pink strips in the step above) as a guide to attach the scallops. That way you will be able to get perfectly consistent scallops all around the cake.
- Next, add the Hello Kitty bows. Make them in the same way as was done for the 3D Kitty topper above and attach them all around the cake.
The birthday name on the cake
- Roll some pink fondant thin. Cut it out with the plaque cutter.
- Roll some white fondant and cut out the letters for the name. Attach them to a pink fondant plaque with shortening.
- Carefully lift the plaque and attach it to the front side of the cake and then add a border to it in the same pink fondant. To make the border, use the extruder tool to pipe out a long strip of thin, pink fondant. Attach it all around the plaque with shortening.
2D Hello Kitty face on the birthday cake
- To make the 2D kitty faces, roll some white fondant thin. Cut the faces using the smaller Hello Kitty face cutter and attach them to the cake with shortening.
- Make the eyes, nose, whiskers and bow in the same way as was done for the 3d Hello Kitty cake topper.
The cake border and final touches
- Next, pipe out long strips of pink fondant ropes using the extruder tool. Twist it to make it look like a rope and attach it around the base of both tiers as the cake border.
- And finally, add both the Hello Kitty cake topper and the number 2 topper on the Hello Kitty birthday cake with the help of some fondant glue.

Leave a Reply